45
comments

April 11, 2011

Hello, Chocolate Cupcakes! (And a Giveaway)


If you're ever in need of a great chocolate cake or cupcake recipe, you need not look any further.  I tried three different recipes for the butterfly cupcakes, and every one of them flopped miserably.  The flavor and texture were completely off, and there was no way I could serve any of the cupcakes at the bake sale in good conscience.  I was almost on the verge of tears after the third batch turned out disastrous.  I didn't realize a good chocolate cupcake was so difficult to make!

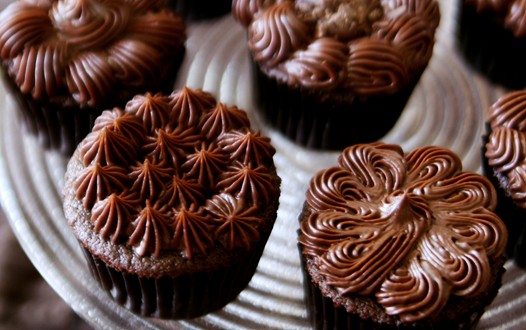
So I turned to a pro, and I wondered why I hadn't done this in the first place!  When in doubt, just head over to Savory Sweet Life.  The ever talented and very gracious Alice does not disappoint.  When it comes to cake, she knows her stuff (she used to own a wedding cake business).  Her chocolate espresso cupcake is to die for.  Its flavor is rich and decadent; the texture moist and dense.  Need I say more?  Just perfect and it saved the butterfly cupcakes.  Next time, I will have to try the Frangelico ganache frosting to go with it.


Alice's Espresso Chocolate Cupcakes
From Savory Sweet Life
Makes approximately 40 cupcakes

Photo from Savory Sweet Life
Ingredients:

2 cups hot strong coffee
1 cup unsweetened cocoa powder
2-3/4 cups all-purpose flour (11-1/4 ounces)
2 teaspoons baking soda
3/4 teaspoon baking powder
1/2 teaspoon salt
1 cup (2 sticks) unsalted butter, softened
1 cup sugar
2 cups brown sugar
1 tablespoon vanilla extract
4 eggs

Directions:
1. Preheat oven to 350 degrees F.  Line standard muffin tins with paper liners.  In a small bowl, mix cocoa powder and coffee until it looks like a smooth chocolate sauce; set aside to cool.  In a large bowl or stand mixer, cream butter and sugars until nice and fluffy.  Add vanilla and eggs one at a time, beating well after each one.  Slowly add flour, baking soda, baking powder, and salt until batter and mix for 2 minutes.  Add chocolate-coffee sauce mixture and mix the cake batter for 3 minutes on medium-high or until the batter is smooth.

2. Fill each muffin cup until 2/3 full.  Bake about 25 minutes. Cool in pan for 5 minutes before removing and allow to cool on a wire rack.


The Giveaway
So now it's your turn to make some amazing cupcake creations!   I'm giving away two copies of Hello, Cupcake! to readers (domestic U.S. residents only).  This book is filled with wonderful, playful ideas on how to dress up the average cupcake (like the candy butterflies).  The instructions and photos in the book really do make it easy for anyone to make these fun creations.   


TO ENTER THE DRAWING FOR THE BOOK GIVEAWAY 
(open to domestic U.S. residents only):
Simply leave a comment telling me what your favorite cupcake flavor is.

For extra entries:
  • Like Eaternal Bliss on Facebook and leave another comment letting me know you did so (if you already like, you can add a comment letting me know).
  • Follow Eaternal Bliss publicly via Google Friend Connect (again, if you're already doing this, just let me know).
  • Post about the giveaway on Twitter: "Win a free copy of "Hello, Cupcake!"  at http://bit.ly/ia4XOv via @mothersmementos."  Leave an additional comment letting me know you tweeted this.

Deadline for entry is 11:59pm EST on Monday, April 18, 2011.  Two winners will be randomly chosen by a number generator.  I'll announce winners and email them directly to let them know they've won.

Good luck!  And please do try Alice's amazing chocolate cupcake recipe.  You won't regret it.
9
comments

April 7, 2011

Butterflies Come to Life


The inspiration for the candy butterflies came from this fun book:


It's filled with tons of creative ideas for cupcakes, including the butterfly:


You might notice my butterflies look slightly different.  I tried using the template provided in the book but didn't care for how it turned out (too many squiggly lines).  So I decided to draw my own:


And a template was created (you can download it here if you like):


Then I gathered my materials and got ready to work.  Now I'll be up front about this.  I had my doubts whether I could do this.  The book claims these are creations anyone can make.  Well, I still wasn't confident I could pull this off.  I practiced making these the weekend before the bake sale just to see if they were feasible.  After the first few attempts, I was ready to can the idea and just make butterfly shaped cookies instead.

I guess my determination got the best of me.  I made some adaptations (which included making my own template) and after a few more tries, I started to slowly get the hang of it and figured out what worked and didn't work.  Some of the mistakes I made included snipping the hole too big (thus causing the chocolate to ooze out everywhere) and another blunder was trying to work with the candy when it started to harden.  It really is important to keep it melted and soft while you're working with it.  So make sure you're not too far from the microwave.

That being said, practice does make perfect.  So don't give up if you try this and it doesn't work out the first few times.  You'll just have a few less-than-perfect wings for you to enjoy.  :)  I had a bunch.

So here's how these butterflies came to life.  

Candy Butterfly Topping
Makes 12 butterflies
Inspired by Hello, Cupcake!

What you'll need:
12 chocolate cupcakes baked in liners
1 cup dark chocolate melting wafers (I used dark mint chocolate, available at A.C. Moore and Michaels)
1 cup candy melting wafer in any color (I used pink and blue)
2 tablespoons white nonpareils
3/4 cup dark chocolate frosting
1 can vanilla frosting (I made cream cheese frosting)
Parchment paper
Toothpicks
Three ziplock bags
Wilton Open Star Tip (I used star tip 199) - for butterfly body
Scissors
Butterfly template (here's the one I created)


1.  Gather all your materials together.  The candy wafers dry quickly, so it's important to be fast, efficient, and have everything on hand!


2.  Cut out 12 sheets of parchment paper large enough to be placed over your template.


3.  Place 1 cup each of dark chocolate and blue candy wafers into separate ziplock bags.  Don't seal the bags.  Microwave for 15 seconds to soften.  Massage the wafers in the bags and return to the microwave.  Repeat this process until the candy is smooth (about 1 minute total).  Press out the excess air and seal the bags.  Then place in small bowls. 


4.  Take the scissors and snip the corner of each bag.  My recommendation is to snip a very tiny hole.  If the hole is too big, it's hard to control the flow of the chocolate and it'll just get everywhere.  Using the dark chocolate, work one wing at a time and outline the template on wax paper.


5.  Fill in the inside area with the blue melted candy. 


6.  Softly rap (pull back and forth) the parchment paper to flatten the candy and help the colors smooth into each other.


 7.  While the candy is still soft, take a toothpick and pull through the two colors from the outside in.  Rap the paper again to smooth it out.


8.  Add a few sprinkles of nonpareils to the top and bottom corners of the wing.  Believe it or not, I found this to be a challenging step because the sprinkles would get all over the wing.


9.  Repeat steps 4-8 for the other wing.  Let dry completely (this doesn't take long) and your wings are done.  You can store them up to 2 days prior to use in a cool, dry place.


Tips:
  •  This might go without saying, but I'll say it anyway.  Be certain to seal the bags once the candy is melted.  I made the mistake of forgetting to do that and the candy just oozed everywhere.
  • The melted candy dries quickly.  If it doesn't flow easily and starts to harden, reheat for another 15 seconds.  I found I had to reheat after every 4 wings.

Now time for the assembly when the frosted cupcakes are ready. 

1.  Cut a hole into the corner of a pastry/ziplock bag large enough to insert the star tip.  Fill with dark chocolate frosting.


2.  Gently insert the wings into the frosting.  With a toothpick, carefully scoop out the frosting between the wings.


3.  Squeeze four small dots of the chocolate frosting between the wings.  And your butterfly cupcake is complete!


The book suggests making antennas for the butterfly, but for the life of me, I could not get those to turn out well.  The butterflies looked beautiful without them, and I strongly doubt anyone missed them.


This is an elaborate and time-consuming process but very worth it in the end.

Come back for the next post and I'll share the recipe for the chocolate cupcake and maybe offer a copy or two of the Hello, Cupcake! book to readers.  :)
3
comments

Beauty in the Mess of Life

Photo courtesy of Shanna Murray.  The proceeds from the sales of these gorgeous decals go to support Japan.
Quote from Mother Teresa

Before I share how to create the butterflies, I hope you'll bear with me as I share with you why I chose to make them and its significance to me.  Butterflies have always been a symbol of hope and new life.  And for me, they have always represented something beautiful blossoming out of something not so beautiful (no offense to those who happen to think caterpillars are gorgeous creatures).  Beauty can be found, even in the midst of ugliness and the mess of life.

So what beauty could possibly come out of the devastation and tragedy that occurred in Japan?  Well, what I've witnessed in the past couple weeks is complete strangers rallying together to come to the aid of other strangers.  I've seen everyone tweeting, blogging, facebooking, emailing, and doing whatever they can to help in the small ways that they can.  Compassion is not lost on us. 

It reminded me so much of the response after 9/11.  I had just moved from D.C. to the New York area the month prior.  I didn't know anyone, and I didn't even have a steady job.  I was temping as a receptionist at the time.  On the morning of September 11, 2001, I had reported bright and early to a job at an architectural firm located in midtown Manhattan.  Half an hour later with the first plane crash, the world had changed.  I still remember the events of that day very clearly (I have an online journal entry with updates as the day occurred).  The horror of what took place that morning shook and shattered my soul.  I remember walking out into the streets a couple hours after the World Towers collapsed and being assaulted by the sound of sirens and the wretched smell of smoke and ashes.  I saw people running in every direction, some covered in soot.  There were others desperately and frantically trying to make phone calls, but the lines were all jammed.  Unbeknownst to me at the time, my husband-to-be worked on Wall Street.  God spared his life.  But others I know lost loved ones that day.

Knowing I wouldn't be able to get over the bridge or through the tunnel to get home that day, the office manager was kind enough to offer her place to me.  I had never met her until that morning.  I was a stranger to her, and yet she opened up her home to me.   That day, we weren't strangers.  We weren't a part of the rat race pushing and shoving to be first.  We weren't tough, hard ass New Yorkers.  She wasn't Jewish, and I wasn't Korean-American.  That day, we were all just human crying out and caring for our fellow brothers and sisters.

I saw this again in the aftermath of Japan's earthquake and tsunami.  Complete strangers of every background from every nation working together for a common good.  Compassion, kindness, love, and generosity being demonstrated in the face of such devastation.

Image courtesy of NYC Bake Sale for Japan organizer and friend, Lillian
That's the beauty that rises from the mess and ugliness of life.  That's hope.  For us and for Japan.

10
comments

April 5, 2011

D.I.Y. Cupcake Wrappers


I am so happy to report that the NYC Bake Sale for Japan raised over $4,600!  And the nationwide bake sale raised over $120,000 for Japan!  I am simply amazed at how folks - most who have never met - rallied together for this cause and put so much love and effort into this event.  It was an amazing privilege to take part even in the smallest way.  Thank you to all the organizers, donaters, bakers, volunteers, and everyone who participated in the bake sale (including those who bought the goodies for a great cause)!

I contributed butterfly cupcakes and this week I'll show you how they came together.  I know folks are more interested in how the actual chocolate butterflies were created, and I promise that'll be the next post.  Today I want to show you the easiest way to dress up cupcakes.  Cupcake wrappers!

There is nothing new or innovative about this.  I'm just passing along the knowledge.  And knowing is half the battle.  Okay, my husband thinks it's cheesy whenever I say that (I say it a lot), but come on!  Who doesn't love G.I. Joe?  :)

D.I.Y. Cupcake Wrappers

What you'll need:

1.  Start off by selecting a handful of pretty cardstock paper.  Oh, how I love pretty paper!


2.  Print out the cupcake wrapper template and cut it out.  I copied it on a piece of cardboard paper so it would be easier to trace.  With a pencil, trace the wrapper template on the back of the paper.  You can fit 4 on a single 12"x12" sheet.


3.  Cut along the lines with plain cutting scissors.


4.  Then take the craft scissors with the scalloped edge and cut along the top part of the wrapper.


5.  And voila!  Your cupcake wrappers are complete.


When you're ready to use them, wrap the paper around the cupcake and secure it either with gluestick or double-sided tape.  

Look how instantly they dress up a plain cupcake!  My husband said I didn't even need the butterflies.  This would have been good enough.  But the butterflies were the whole point for the bake sale!


You could dress up the cupcake wrappers even more by decorating with rhinestones, stamps, or other embellishments.  But I didn't want to take away from the butterflies.  This is a fun project to do with older kids who are good with scissors.  My son loves crafts, but this is a bit advanced for him.  So he was happy doing another project while Mommy worked on these.


I'll show you how to make the chocolate butterflies in the next post, so be sure to check back. 

Happy creating, everyone!
12
comments

April 1, 2011

Made With Love and Prayers for Japan


Like so many others, my heart goes out to the people of Japan.  Tomorrow's Bake Sale for Japan happening all across the nation is just a small and simple way for me and others to help in some way.  And as the quote at the top of the bake sale site says, "Small acts, when multiplied by millions of people, can transform the world."  I believe that.

As I thought about what I wanted to contribute, I had a desire to make something symbolic of new life and new hope.  The butterfly seemed perfect.


There are many wonderful bloggers (New York ones listed here), homemade bakers, and incredible local bakeries donating goods to tomorrow's New York bake sale.  Thank you to the organizers and all those contributing goods and donating funds toward Peace Winds Japan!


And a personal gratitude with much love to my sister-in-law for watching the boys and allowing me to get these ready for tomorrow!  And also a huge thank you to Alice of Savory Sweet Life for saving the chocolate cupcakes with her killer recipe.

I know folks are curious, so I'll post a 3-part series next week on how these cupcakes came together.

In the meantime, they're packed and ready to go.  If you're in the New York area, please come out to Brooklyn Flea tomorrow and support this wonderful cause.


To the people of Japan and all those affected by the recent disaster, may God heal your land, your hearts, and fill you with great Hope in the midst of great tragedy.  Our thoughts and prayers continue to be with you.
 

Copyright © 2012 Mother's Mementos | Blogger Templates by Splashy Templates | Free PSD Design by Amuki