Showing posts with label recipes. Show all posts
7
comments

March 19, 2012

Liquid Gold (aka Chicken Stock)

{ Chicken stock from the leftovers of one rotisserie chicken.  
Labels are self-stick notepads from last year's IJM's Global Prayer Gathering. }

Who doesn't love rotisserie chicken (well, besides vegetarians and my mother-in-law who has an abnormal aversion to anything chicken)?  Now our family has been around the block when it comes to store-bought rotisserie chicken.  We've tried one at nearly every location that offers it (including some specialty shops), and we have yet to find one better than  . . . Costco's.  And at $4.99, you can't beat the price!  I always wonder how they can offer it at such a low price and how they keep their chicken so tender and moist (I plan on asking at my next trip).

Anyhow, the thing I love about rotisserie chicken is its many uses.  I love shredding the chicken and using it for all kinds of different recipes (which I plan on sharing later).

The thing is, though, that most people are probably missing out on the best part of the rotisserie chicken.

This:

Most people see this and think "trash."  No!  Not at all.  You don't want to throw this stuff out.  It's liquid gold.

You throw that sucker into a pot with water, onions, salt, pepper, celery, and others herbs and spices, let it simmer for a few hours, and you've got yourself the best chicken stock money can't buy.


I've made some of the best chicken soup with this, and I love to use it in my cooking.


And the boys absolutely love it.  They sometimes like it as plain and simple as rice mixed in the broth.   This soup has helped mend many winter colds.  They'll eat it up and sometimes even slurp it up with a straw (why, I don't know).


So next time you see this:


Think this:


And you won't regret it.

This recipe is for the most basic chicken stock involving 5 ingredients.  It tastes amazing.  But for added flavor, you can include celery, carrots, parsley, thyme, and garlic.

Chicken Stock
{Prep time: 10 minutes; Cook time: 4 hours; Makes: 4 quarts}

Ingredients:
Carcass and remains from 1 rotisserie chicken
18 cups of water
2 tablespoons kosher salt
1 tablespoon black pepper
1 onion, unpeeled and quartered

Directions:
  1. Place the chicken carcasds, onion, pepper, and salt in a large stockpot. 
  2. Add 18 cups of water and bring to a boil.  Lower heat and simmer, uncovered, for 4 hours. 
  3. Strain contents, using a colander, into another large stockpot. 
  4. Chill broth overnight and remove the surface fat the next day. Use immediately or freeze in containers for up to 3 months.

4
comments

February 1, 2012

Roasted Parsnip Chips


Who knew that parsnips could be so pretty or taste so good?  I surely didn't until I picked up Annabel Karmel's book, My Favorite Recipes, from the library.


As soon as I saw the beautiful bloom of parsnip chips, I knew I wanted to try the recipe even though I've never cooked with parsnips before.  So I went to the local grocery store and picked up 4 parsnips, located right next to the carrots in the produce section.


This recipe is so simple.  It requires two steps and then you've got a beautiful presentation of healthy snacks for you and the kids.  The flavor is very similar to taro chips.


Once baked, assemble in a bowl or jar and snack away.  Enjoy!


Roasted Parsnip Chips
Adapted from My Favorite Recipes

Ingredients:
2 parsnips
2 tbsp olive oil
Salt and pepper


Directions:
  1. Preheat oven to 350 degrees F.  Peel the parsnips and cut off the ends.  Cut into thin, long slices (much easier to do with a mandolin slicer).
  2. Lay the parsnip slices on a baking sheet with parchment paper.  Lightly drizzle with olive oil, and season with salt and pepper.  Roast for 30 minutes or until golden, turning every 10 minutes.
12
comments

February 28, 2011

Bite-sized Decadent Brownies


I don't know about you, but I am so ready for spring!  In early anticipation, I decided to bake a treat fit for Easter.  I used a Wilton mini-cupcake silicone mold in adorable daisy shapes and created these decadent brownies.  They're not decadent because they're difficult to make; they're decadent because it's difficult to not overindulge bite after bite.  Before you know it, you've consumed 20 of these little suckers without even realizing it (not that I'm speaking from personal experience or anything like that).  :)

I found the Wilton mini-cupcake daisy mold at the local Christmas Tree Shop and got it for less than $8.  What a great buy!  I know I'm going to be using this often. 

{ Love this mold! }

Ok, so here's why I love these brownie bites!  My favorite part of brownies are the chewy edges.  Yum!  Because these molds create small, individual brownies, they each turn out chewy and delicious.  Almost like chewy chocolate cookies.   And it couldn't get any simpler with a little help from Duncan Hines.  :)  My favorite brownie mix though, if you must know, is Betty Crocker's Triple Chunk Brownies.  That's one serious box of chocolate chewy, gooey goodness.

These brownie bites are scrumptious and addictive just by themselves.  But you can doll them up with a simple swirl of frosting or get really festive with sprinkles and your favorite Easter candy.  I chose to make them more decadent with hazelnut flavored cream cheese frosting, sugar sprinkles, and peanut M&Ms.

One word of caution:  Lightly coat the mini-cupcake pan with cooking spray prior to pouring the batter in.  This will keep it from sticking.  Another tip:  after baking, be sure to let the brownies cool completely in the mold before removing them.  Otherwise, they'll break apart. 

By the way, please don't let my hand in the photos detract you from the treat.  I was obviously not meant to be a hand model like Joey from "Friends" (love that episode!).

Enjoy and cheers to warmer days!


Bite-sized Decadent Brownies
{Prep time: 10 minutes; Bake time: 25 minutes; Makes approx. 32 bite-sized brownies}

1 19-oz package brownie mix
1 egg
1/3 cup water
1/3 cup vegetable oil
Cooking spray to coat mini-cupcake pan
1 recipe hazelnut cream cheese frosting (see below)
Sprinkles and candy for topping

Heat oven to 350 degrees for shiny metal pan (325 for nonstick or glass pan).   Lightly coat mini-cupcake pan with cooking spray.  In a large bowl, stir brownie mix, egg, oil, and water until well blended.  Pour batter by rounded teaspoon (approx. 2) into each mold, filling it about 2/3 full.  Bake for 25 minutes or until toothpick inserted in center comes out clean.  Let cool in pan on wire rack completely before removing brownies from the mold.  Once cooled, gently remove the brownies, frost and decorate.
Hazelnut Cream Cheese Frosting
1 8-ounce packages cream cheese, softened
1 stick butter, softened
1 cup sifted confectioners' sugar
3/4 teaspoon hazelnut extract

In the bowl of an electric mixer fitted with the paddle attachment, on low speed, cream together the cream cheese, butter, and hazelnut extract. Add the confectioners' sugar and mix until smooth.
30
comments

February 13, 2011

Strawberry Cupcakes with Strawberry Buttercream Frosting

{ made with love for my love }
This was the special treat made for my husband's birthday this past Friday (recipe courtesy of Martha Stewart).  I also made extra to contribute to a fundraising bake sale with the proceeds going toward a wonderful New York-based, non-profit organization called Bread and Water (they help provide relief across the world). 

It's a wonderful dessert to share with loved ones on Valentine's Day or any day for that matter.  I love the light fluffiness and sweet strawberry flavor of the buttercream frosting, but the cake itself is also delicious and moist (with the help of a little milk). 

Though the recipe can seem intimidating, it's really not.  The cupcake is simple to make (the most time-consuming part was chopping the strawberries).  The swiss meringue buttercream frosting can be made in advance or while the cupcakes are baking.  Here's a basic tutorial on how to make swiss meringue buttercream frosting.  If you refrigerate the cupcakes, just be sure to let them defrost at room temperature for a couple hours before serving.

To make it more festive, I transformed strawberry gummy candy and strawberry slices into heart shapes as garnish.


I've made a handful of different cupcakes now, and I have to say these are definitely among the top fave. 

Happy Valentine's Day!


Strawberry Cupcakes with Strawberry Buttercream Frosting
Recipe from Martha Stewart
{ Makes 34 cupcakes }

Ingredients:
2 3/4 cups all-purpose flour
1/2 cup cake flour (not self-rising)
1 tablespoon baking powder
1 teaspoon salt
8 ounces (2 sticks) unsalted butter, softened
2 1/4 cups sugar
3 large eggs plus 1 large egg white
1 cup whole milk
1 1/2 teaspoons pure vanilla extract
2 cups finely chopped strawberries, plus small strawberries for garnish (or use gummy strawberry candy for garnish)
Strawberry Buttercream (recipe below)

Directions: 
  1. Preheat oven to 350 degrees. Line standard muffin tins with paper liners. Whisk flour, baking powder, and salt in a large bowl.  Cream butter and sugar with a mixer until light and fluffy.  Add eggs, 1 at a time, beating after each addition.
  2. Reduce speed to low. Mix in the vanilla. Add flour mixture to butter mixture in 3 additions, alternating with milk and ending with the flour.  Scrape sides of bowl.  Stir in chopped strawberries.  Divide batter among muffin cups, filling each 2/3 full.
  3. Bake cupcakes until testers inserted into centers come out clean, about 20 minutes. Let cool in tins on wire racks.  Once cupcakes are cool, frost tops with strawberry buttercream.  Frosted cupcakes will keep, covered and refrigerated, for up to 2 days. Top with a strawberry just before serving.

Strawberry Buttercream Frosting
Recipe from Martha Stewart
{Makes about 5 cups}

Ingredients:
4 large egg whites, room temperature
1 1/4 cups sugar
3/4 pound (3 sticks) unsalted butter, softened, cut into small pieces
1 1/2 cups fresh strawberries, pureed

Directions:
  1. Place whites and sugar in a heatproof mixer bowl set over a pot of simmering water. Whisk until sugar dissolves and mixture registers 160 degrees on a candy thermometer.
  2. Remove from heat, and attach bowl to a mixer. Whisk on medium speed for 5 minutes. Increase speed to medium-high, and whisk until stiff, glossy peaks form, about 6 minutes. Reduce speed to medium, and add butter, 1 piece at a time, whisking well after each addition.
  3. Switch to a paddle attachment. With mixer on low, add strawberry puree, and beat until smooth, 3 to 5 minutes. Use immediately, or cover, and refrigerate for up to 3 days. (Bring to room temperature, and beat on low speed until smooth before using.)
2
comments

January 24, 2011

Toffee Coffee Dark Chocolate Brownies


My hubby loves coffee.  He drinks it like it's water.  He also loves dark chocolate.  So he went ga-ga over these brownies.  He did prefer it without the frosting, but I liked it with and since I was doing the baking, guess who won?  :)

Toffee Coffee Dark Chocolate Brownies
Adapted from Better Homes & Gardens
{ Makes: 20 brownies; Prep: 25 min.; Bake: 35 min. }

Ingredients
1 19.8- or 21-ounce package dark chocolate brownie mix
1/2 cup toffee pieces
2 tablespoons instant espresso powder or instant coffee crystals
2/3 cup walnuts, chopped (optional)

Directions:
  1. Preheat oven to 350 degrees F. Grease a 9-inch square baking pan and set aside.
  2. Prepare brownie mix according to package directions, except stir the 1/2 cup toffee pieces, the espresso powder, and chopped walnuts into batter. Spread batter into prepared pan.
  3. Bake in preheated oven for 35 minutes.  In the meantime, prepare frosting (see instructions below). 
  4. Once brownies are done baking, cool in pan on a wire rack.  Remove baked mixture from pan.  Spread frosting onto cooled brownies and sprinkle with chopped walnuts.  Cut into bars.  Makes 20 brownies.
TO STORE:  Place bars in a single layer in an airtight container; cover.  Store in the refrigerator for up to 3 days.

For Frosting:
1  cup  (1/2 lb.) unsalted butter, at room temperature
4  cups  (1 lb.) powdered sugar, sifted
1/8  teaspoon  salt
2  tablespoons  milk
2  teaspoons  vanilla

Preparation:
In a bowl, with a mixer (preferably fitted with whisk attachment) on low speed, beat butter, 2 cups powdered sugar, and the salt until blended.  Add milk and vanilla; beat until blended. Add remaining powdered sugar, 1 cup at a time, beating until incorporated.  Turn mixer to high speed and beat frosting until fluffy and smooth.
0
comments

January 5, 2011

Spinach Salad with Cranberry Citrus Dressing

 
{ spinach with fruit, nuts, and cheese with a citrus twist }

I don't want to have the reputation of being the culprit for expanding people's waistlines.  So here's a recipe that doesn't involve butter or cream cheese.  :)

A few summers ago, our friends invited us to their lovely new home located in the New York burbs.  A simple but delicious lunch was prepared for us courtesy of our friend, K.  She makes the most amazing desserts (her pastry school background comes in handy).

But it wasn't her dessert that stood out that afternoon.  It was the incredible fresh spinach salad she prepared with a citrus twist.  She pulled out plump, juicy cranberries from the fridge which she had soaked in orange juice overnight.  They were so deliciously sweet, and I loved the citrus flavor.  I watched her put the whole thing together, and it is now my go-to salad recipe.  The added bonus is it's so simple and easy to make!

It's absolutely perfect in the summer, but I can eat this all-year round.  Kids love it, too.

This is the very basic recipe.  But to give it some real punch and extra flavor, add halved grapes, chopped walnuts/pecans, and grated cheese (I used medium sharp provolone in the one pictured above).  And then top with chicken salad.  Yum!

Now I'm craving salad, and I hope you are, too.

Spinach Salad with Cranberry Citrus Dressing

The basic ingredients are as follows:
2/3 cup dried cranberrries
1 cup orange juice
2 or 3 tablespoons olive oil
1/4 teaspoon salt
Black pepper
1 red apple, diced (fuji is my personal favorite)
1 pound spinach (chopped if you prefer)

Directions:
  1. Pour dried cranberries and orange juice into a bowl.  Cover and place in refrigerator to sit overnight so cranberries get plump and juicy (2-4 hours will suffice).
  2. Remove bowl from the fridge.  Dice apple into small cubes and mix with the cranberries and orange juice.
  3. Add olive oil, salt, and pepper to taste.  Stir. 
  4. Pour the mix of cranberries, apples, and dressing over spinach.  Mix and serve.
2
comments

January 3, 2011

Almond Drop Cookies with Almond Glaze

{ almond drops glazed in almond sweetness }
The family went over to a friend's for dinner for some amazing Chinese hot pot (fondue-style Asian stew)!   It was delicious and totally hit the spot.  I'll have to endeavor to make some and host a hot pot party at our home this winter. 

We were in charge of dessert.  I wasn't sure what to make to complement hot pot, but I was in the mood for something with almonds.  Inspired by the vanilla cookie sandwiches, I played around with the recipe and made almond drop cookies drizzled with almond glaze.  They were a hit.

What I love about this cookie is that it's soft, chewy, and has just a touch of sweetness, which is perfect for the kids.  And if you want something a little extra sweet, just drizzle it with some almond glaze goodness. 

I think these could easily become a household favorite.

Almond Drop Cookies with Almond Glaze
{ Prep time: 30 min Bake: 15 min per batch Makes: about 36 cookies }

Ingredients

1/2 cup butter, softened
1 4-ounce package cream cheese, softened
1 cup sugar (or reduce to 3/4 cup)
1/2 teaspoon baking soda
1/4 teaspoon salt
2 eggs
1 teaspoon almond extract
1/2 teaspoon vanilla extract
2 3/4 cups all-purpose flour
2/3 cup coursely chopped almonds
1 recipe Almond Glaze (see below)

Directions
  1. Preheat oven to 325 degrees. Line cookie sheet with parchment paper and set aside. In a large mixing bowl beat butter and cream cheese with electric mixer on medium speed for 30 seconds. Add the sugar, the baking soda, and salt. Beat until combined, scraping sides of bowl occasionally. Beat in eggs, vanilla, and almond extract until combined. Beat in as much of the flour as you can with the mixer. Stir in any remaining flour. Mix in chopped almonds.
  2. Drop dough by placing rounded balls (about the size of a ping pong ball) 2 inches apart onto the prepared cookie sheet. Bake about 13 minutes or until bottoms are light brown. Transfer cookies to a wire rack; cool.
  3. Once the cookies are cool, drizzle icing on top.
Almond Glaze
In a small bowl stir together 1 cup powdered sugar, 1/4 teaspoon almond extract, and enough milk (3 to 4 teaspoons) to make an icing of drizzling consistency. [Tip:  Prepare the almond glaze while the cookies are baking.]
0
comments

January 1, 2011

Cranberry Almond Biscotti

{ cranberry almond biscotti with citrus zest.
perfect in the morning with fresh, hot coffee. }
Cheers and happy 2011, everyone!

Hubby and I actually made it to the strike of midnight (and then passed out shortly thereafter).  We rang in the new year by enjoying a glass of white wine and a plate of homemade biscotti right out of the oven.   I know what you're thinking.  We are such exciting people, and you can hardly contain your excitement at the mere thought of ours!   :)

Okay, so what you're probably really thinking is biscotti?  Why biscotti?  Because I was in the mood.  A friend shared homemade pistachio and almond biscotti with me over the holidays and it was fabulous!  I never thought to make my own, but I figured I'd give it a try.  I was amazed it turned out quite nicely.  The proof is in the empty bowl by noon today. 

I got the recipe for almond biscotti from Better Homes and Gardens but modified it a bit by adding cranberries, almond extract, and using less sugar.

Hubby is already requesting another batch.  Something tells me I'll be making a lot of biscotti in 2011.

Cranberry Almond Biscotti
{Prep: 25 min  Bake: 25 min/20 min  Stand: 15 min.  Oven: 325 degree  Makes: About 24 large cookies}

Ingredients 
  • 2 3/4 cups all-purpose flour
  • 1 1/2 teaspoon baking powder
  • 1 teaspoon salt
  • 1 cup sugar
  • 2 eggs
  • 2 egg yolks
  • 6 tablespoons butter, melted
  • 1 teaspoon almond extract
  • 1 1/2 teaspoons finely shredded orange peel
  • 1 cup coursely chopped almonds
  • 3/4 cup dried cranberries

Directions
  1. Preheat oven to 325 degrees.  Line cookie sheet with parchment paper; set aside.  In a large bowl, stir together flour, baking powder, salt, and sugar.  Make a well in the center of the flour mixture.  Place eggs and egg yolks in the well and stir into the flour mixture.  Add butter, almond extract, and orange peel. Stir until dough starts to form a ball.  Stir in almonds and dried cranberries.
  2. Divide dough into two equal portions.  On a lightly floured surface, shape each portion of dough into a 12-inch-long loaf.  Place the loaves about 3 inches apart on the cookie sheet.  Flatten the loaves until about 1 1/2 inches wide (from top to bottom).  Bake for about 25 to 30 minutes or until firm and light brown.  Let stand on cookie sheets on a wire rack for 15 minutes.
  3. Transfer logs to a cutting board.  Using a serrated knife, cut loaves diagonally into 1/2 inch slices.  Place slices, cut sides down, on cookie sheets.  Bake for 10 minutes.  Turn cookies over; bake for 10 to 15 minutes more or until crisp and golden brown.  Transfer to a wire rack and let cool. 
1 comments

December 27, 2010

Moist Banana Bread

There is truly nothing better than fresh-baked bread right out of the oven (well, actually fresh-baked cookies could give it a run for its money). 

This holiday, I was on a banana bread fix and made 6 loaves over a 3-day span.   I made it Christmas eve morning for the boys and my in-laws, made it for my extended family gathering on Christmas day, and then made another batch for my college holiday gathering on the 26th.  And amazingly enough, I'm still not banana-ed out!

Here's the recipe I use for a moist great-plain-for-breakfast or even-better-when-paired-with-vanilla-ice-cream banana bread.

MOIST BANANA BREAD
{ Prep time: 15 minutes; Bake time: 1 hour }

Ingredients
  • 4 ripe bananas
  • 1/3 cup melted butter
  • 1 cup sugar (you can reduce to 3/4 cup)
  • 1 egg, beaten
  • 2 tablespoons applesauce (this is key to making the bread moist)
  • 1 teaspoon pure vanilla extract
  • 1 teaspoon baking soda
  • Pinch of salt
  • 1 1/2 cups of all-purpose flour

Directions

Preheat the oven to 350°F.  Place bananas in a large mixing bowl and mash with a potato masher.  Mix the melted butter into the mashed bananas.  Then mix in the sugar, egg, applesauce, and vanilla.  Mix in the baking soda and salt.  Add the flour last and mix.  Pour the mixture into a buttered 4x8 inch bread loaf pan.  Bake for 1 hour (if your oven tends to heat faster, you should check it at 45 minutes and see if it's cooked - overcooking will dry out the bread).  Keeping the bread in the pan, cool it on a rack.  Remove from pan and slice to serve.
The slice of bread goes perfectly with a scoop of vanilla ice cream.  You could easily add chopped walnuts or raisins.  But if you're making it for an event or gathering, I'd suggest keeping it simple because (1) you never know if someone has nut allergies and (2) you just can't go wrong with plain banana bread.
1 comments

December 20, 2010

Peppermint and More Peppermint

{ peppermint pretzels with peppermint cocoa.  yum.  }
Chocolate-covered peppermint pretzel rods drizzled with white chocolate paired with peppermint chocolate cocoa (available from Crate & Barrel).  Could there be a better match?  I think I've died and gone to peppermint heaven.

The pretzel rods were super easy to make!  I followed the same steps as I did for making the chocolate-covered pretzels but made two variations.  First, I added 2 teaspoons of peppermint extract to the melted chocolate to give it a more minty taste.  And then I drizzled white chocolate over the dark (I used a chopstick to do this) to make it more decorative before sprinkling on the peppermint.

Delicious.

Chocolate-Covered Peppermint Pretzel Rods
{ Makes about 24 pretzel rods }

Ingredients
  • 1 package (12 oz) semi-sweet chocolate chips
  • 1 package (12 oz) white chocolate chips
  • 1 tbsp shortening (this helps temper the chocolate for dipping)
  • 2 tablespoons peppermint extract
  • Bag of large pretzel rods
  • Peppermint candy canes 

Directions
  1. Place unwrapped candy canes in a ziploc bag and crush into small pieces with a hammer.
  2. Prepare a baking sheet by lining it with parchment paper.
  3. Combine the chocolate chips, the shortening, and peppermint extract in a small pot and stir over low heat.  Once the chocolate is smooth and melted, remove from heat.
  4. Dip 2/3 of pretzel rod in the chocolate.  Tap the chocolate-dipped pretzel several times to remove excess chocolate, and place it on the prepared baking sheet. 
  5. Melt the white chocolate chips over low heat.  Then take a fork (I used a chopstick) to drizzle it over the dark chocolate.  Sprinkle with peppermint candy.
  6. Place the pretzels in the refrigerator for about 30 minutes to set the chocolate.
0
comments

December 15, 2010

Chocolate-Covered Peppermint Pretzels

{ the perfect combination of salty and sweet in really festive shapes }
Some snacks are just dangerously addictive.  Chocolate-covered pretzels are one of them.  It's the perfect combination of both salty and sweet.  I made a batch last week, and while my husband and I were idly surfing the web, we devoured the entire bag within minutes. 

Since you possibly can't go wrong with these, I decided to make them as holiday treats for my office, my husband's, and for my sister-in-law's holiday party.  Yes, that's a lot of pretzels.  

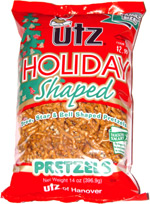
Last night, I went to the local grocery store and spent a while in the snack aisle looking for the right pretzels.

And you cannot imagine my delight when I saw this!

I was so excited, I let out an audible squeal and got some strange looks (always a fun experience at the grocery store).  :)  I ended up buying two bags and hand-dipping each and every tree, bell, and star.  Though this is the simplest thing to make, hand-dipping pretzels is a tedious task.  So be forewarned that if you want to make a huge batch, set aside a couple hours or enlist the help of a few friends and have a pretzel-making party. 

The incentive:  you get to eat all the broken pieces!  Yum!


Chocolate-Covered Peppermint Pretzels
{ Makes about 50 pretzels }

Ingredients
  • 1 package (12 oz) semi-sweet chocolate chips or white chocolate chips
  • 1 tbsp shortening (this helps temper the chocolate for dipping)
  • Large bag of pretzel twists
  • Peppermint candy canes 

Directions
  1. Place unwrapped candy canes in a ziploc bag and crush into small pieces with a hammer.
  2. Prepare a baking sheet by lining it with parchment paper.
  3. Combine the chocolate chips and the shortening in a small pot and stir over low heat.  Once the chocolate is smooth and melted, remove from heat.
  4. Using tongs, fork, or chopsticks, dip the pretzel in the chocolate.  Tap the chocolate-dipped pretzel several times to remove excess chocolate, and place it on the prepared baking sheet.  The chocolate dries quickly, so you'll want to sprinkle the peppermint while it's still wet.  Dip, place, and sprinkle every 5 pretzels or so.
  5. Place the pretzels in the refrigerator for about 30 minutes to set the chocolate.

I have about 200 pretzels sitting in my kitchen and tempting me at every turn.  These are lethal.
3
comments

December 12, 2010

Spicy Korean Tofu Soup (Soondobu Jigae)

{ apologies for making your mouth water }
It's cold and wet outside.

Perfect excuse for spicy tofu soup!  Not that I need an excuse.  This is my favorite dish.  It's called soondobu jigae in Korean.  I could eat this all year round and have been known to (even on sweltering hot summer days).  But this soup is particularly good when it's cold out - it hits the spot and immediately warms you up!  And my personal motto when it comes to tofu soup is "the redder, the better."  I love it extra, extra spicy! 

There is a Korean restaurant by the name of So Gong Dong in northern New Jersey infamously known for their tofu soup.  And for good reason.  It's amazing!  James and I have tried others, and they just don't compare.  There's something about the tofu itself, but we're certain they add some top-secret, special ingredient to its broth.

I was determined to find out what.

So I began my quest by researching recipes online in an attempt to replicate the flavor of So Gong Dong's soup, and nothing came close.  I could never get it right.  I had nearly given up on the idea of ever making homemade tofu soup again.

Until one day at the Korean market, I laid eyes on this:

The tofu broth seasoning.

{ the secret ingredient? }
It certainly couldn't hurt to try.  The package includes 3 packets of seasoning powder and seasoning oil and for only $3.49.  I will preface by saying that I tried following the instructions on the package but found the flavoring pretty weak.  So I had to improvise and try out a few different variations.  And I think I finally found one I like (recipe below).

I'm certain this seasoning mix is not So Gong's Dong top-secret ingredient, but if prepared properly, it's great arsenal for making a pretty decent homemade version.  I always keep some in my pantry for days like this.


There are many variations you can make to this recipe.  I love the seafood tofu soup at So Gong Dong, so in the past, I've added uncooked shrimp and clams (make sure to add these once the soup is boiling and cook until clams open and shrimp turns pink).   Or you can add any of these ingredients:  sliced pork, beef, kimchi, or enoki mushrooms. 
Spicy Korean Tofu Soup (Soondobu Jigae)

Ingredients
  • 1 package of 1lb soft tofu (I prefer soft over silken)
  • 1 package Pulmone Tofu Broth Seasoning
  • 3 cups water
  • 1/2 tablespoon sesame oil
  • 1 scallion, sliced in small pieces
  • 1 teaspoon garlic, finely chopped
  • 1 egg, uncooked
  • 1/2 tablespoon of beef or fish flavor soup stock ("dashida") - add more to taste*
  • 1/2 tablespoon Korean hot bean paste ("gochujang") - add more to taste*
  • 1/2 tablespoon crushed red hot pepper ("gochukaru") - add more to taste*
[*When I first started making Korean food, I asked my mother for measurements in her recipes and she always told me there are no measurements.  You just taste it and add more or less and decide what tastes good.  Of course, this was not very helpful to me at the time, but she was right.  So these are just guidelines; I always end up adding a little more of each).

Directions:
  1. To prepare seasoning, mix 1 cup water, one package of Tofu Broth seasoning (powder and oil), and hot bean paste in a bowl.  Set aside.
  2. Cut up tofu into small cubes. 
  3. Place cubes in the seasoning mix and stir gently; be careful not to break up the tofu pieces (I find this step of soaking the tofu in the mix helps ensure the flavoring seeps in).  Set aside.
  4. In a pot, stir-fry the garlic and sesame oil over medium heat until lightly browned.
  5. Add the bowl of seasoned tofu to the pot, stir with the garlic, and cook over high heat for a few minutes; stir occasionally.   (This is another step I take to ensure better flavoring.  I find that if you add all the water right away, it loses some flavoring).
  6. Add 2 more cups of water and cook until boiling (if you prefer more soup, add more water).
  7. Add the beef or fish flavor soup stock and the crushed red hot pepper.  Add more of each to taste if necessary.
  8. Add uncooked egg to the soup and stir until cooked.
  9. Sprinkle with scallion and it's ready to serve. 
You can also make a non-spicy version of this soup, but really, what would be the fun in that?  :)

If you try this, I'd love to hear what you think and what modifications you would or did make.
4
comments

December 10, 2010

Vanilla Cookie Sandwiches with Buttercream Frosting

{ cookie sandwiches with peppermint and toffee }
 Although it's hard to find the time with two little ones, I love baking and trying new recipes when I can.  And I love baking even more when my son lends a hand!  Today CJ and I made these delights.  I got the recipe from Better Homes & Gardens Ultimate Cookie Book (one of my favorite cookie recipe books).

I love that the cookie itself is soft, chewy, and has just a hint of sweetness (which is perfect for the kids!).  When paired with the buttercream frosting, it gives it that perfect sweet guilty pleasure (perfect for the grown ups!).  The crushed candy adds a nice crunch.  I used peppermint candy canes and Heath toffee bars.


Vanilla Cookie Sandwiches with Buttercream Frosting
(from Better Homes and Gardens Ultimate Cookie Book)

FOR COOKIES
{ Prep time:  30 min  Chill:  2 hr  Bake:  6 min per batch
Makes:  about 30 sandwich cookies }

Ingredients
1/2 cup butter, softened
1 3-ounce package cream cheese, softened
1 cup sugar
1/2 teaspoon baking soda
1/4 teaspoon salt
2 eggs
1 1/2 teaspoons vanilla
2 3/4 cups all-purpose flour
Sugar (optional)
1 recipe Buttercream frosting (below)
Crushed candy of choice

Directions
1.  In a large mixing bowl beat butter and cream cheese with electric mixer on medium speed for 30 seconds.  Add the 1 cup sugar, the baking soda, and salt.  Beat until combined, scraping sides of bowl occasionally.  Beat in eggs and vanilla until combined.  Beat in as much of the flour as you can with the mixer.  Stir in any remaining flour.  Divide dough in half.  Cover and chill dough about 2 hours or until easy to handle.
2.  Preheat oven to 375 degrees.  On a lightly floured surface, roll half of the dough at a time until 1/8 inch thck.  Using a 1 1/2-inch round cookie cutter, cut out dough.  Place cutouts 1 inch apart on an ungreased cookie sheet.  If desired, sprinkle cutouts lightly with additional sugar.  Bake for 6 to 7 minutes or until bottoms are light brown.  Transfer to a wire rack; cool.
3.  Spread buttercream frosting onto the bottom halfs of the cooled cookies.  Top with the remaining cookies.  Roll edges in the crushed candy.


FOR BUTTERCREAM FROSTING
{ Start to finish: 10 min  Makes:  about 2 1/2 cups }

Ingredients
1 cup butter, softened
2 teaspoons vanilla
4 cups powdered sugar
2 to 4 tablespoons milk

Directions
In a bowl beat butter with an electric mixer on medium speed until fluffy.  Add vanilla.  Beat in half of the powdered sugar.  Beat in 2 tablespoons of the milk.  Beat in the remaining powdered sugar until smooth.  Beat in enough of the remaining milk to make a frosting of spreading consistency.

FOR THE CANDY COATING
Crush candy of choice (candy canes, peppermint candies, Heath toffee bars).  Easiest way to do this is to put the candy in a ziploc bag and crush with hammer.  Once the cookie is assembled, roll the edges in the crushed candy.

The end result?

An enthusiastic thumbs up from my taste testers!

2
comments

November 22, 2010

Swiss Meringue Buttercream Frosting

{ rosy and buttery cupcakes }
I am a huge fan of cream cheese frosting because (1) it tastes great, (2) it's easy to make, and (3) you can make countless variations.

But I thought I would be adventurous and try something new and different this weekend.  So I attempted to make swiss meringue buttercream frosting.  This definitely requires a bit more time, but the frosting is so amazingly light, smooth, and buttery.

Since I was going all out on the frosting, I kept the cupcake itself very simple and used Trader Joe's Vanilla Cake Mix (I LOVE Trader Joe's products).  I simply followed the instructions on the box.

Here are the instructions for the frosting.


Swiss Meringue Buttercream Frosting
(Recipe from Martha Stewart)

Makes about 9 cups, enough for about 28 cupcakes


1. Gather ingredients:
  • 2 1/2 cups sugar
  • 10 large egg whites
  • 4 cups (8 sticks or 2 pounds) unsalted butter, cut into pieces
  • 2 teaspoons pure vanilla extract
2.  Place sugar and egg whites in the heat-proof bowl of an electric mixer. Set bowl over a pan of gently simmering water, and whisk until sugar has dissolved and egg whites are hot to the touch, about 3 minutes. Test by rubbing the mixture between your fingers; it should feel completely smooth.

3.Transfer bowl to mixer stand. Using the whisk attachment, beat on high speed until mixture has cooled completely and formed stiff and glossy peaks, about 10 minutes.

4. Add the butter, one piece at a time, and beat until incorporated after each addition. Don't worry if the buttercream appears curdled after all the butter has been added; it will become smooth again with continued beating. Add vanilla, and beat just until combined.

5. Switch to the paddle attachment, and beat on the lowest speed to eliminate any air pockets, about 5 minutes. If using buttercream within several hours, cover bowl with plastic wrap, and set aside at room temperature in a cool environment. Or transfer to an airtight container, and store in the refrigerator, up to 3 days. Before using, bring buttercream to room temperature, and beat on the lowest speed with the paddle attachment until smooth, about 5 minutes.

6.  And buttercream frosting is complete!

I tinted the frosting with Wilton's icing color in Rose Petal Pink to add the pretty pink hue.

I'll definitely be making this frosting again!
3
comments

November 16, 2010

Pumpkin Cupcakes with Maple Frosting

{ pumpkin + maple + heath toffee bits = perfect combination for the holidays! }
A few of my favorite things about Thanksgiving involve pumpkin pies, pumpkin cheesecakes, pumpkin bread . . . anything and everything pumpkin!

So why not pumpkin cupcakes?  I found the perfect recipe from Ina Garten.

But I'll let you in on a little secret.  I cheated and used this:


And it turned out moist and delicious.  So if you're short on time or just like shortcuts, here's the modified and simpler recipe (yields 12 cupcakes):


Pumpkin Cupcakes

Ingredients
  • Trader Joe's Pumpkin Bread Mix
  • 2 large eggs
  • 1/2 cup of vegetable oil
  • 1 cup of water
  • 1/2 cup coarsely chopped Heath bars

Directions

Preheat oven to 400 degrees.  Mix the ingredients.  Using an ice cream scoop, divide the batter into a muffin tin with cupcake liners (I fill the cup 2/3 full).  Bake for 18-20 minutes, until toothpick inserted in center comes out clean.  Place the cupcakes on a wire rack to cool completely.  Spread the cupcakes with maple frosting and sprinkle with chopped Heath bits.

Maple Cream Cheese Frosting

Ingredients

  • 8 ounces cream cheese, at room temperature
  • 1/4 cup unsalted butter, at room temperature
  • 1/4 teaspoon maple syrup
  • 1/2 teaspoon pure vanilla extract
  • 2 cups sifted confectioners' sugar (I normally use a little less so the frosting isn't too sweet)
Directions

In the bowl of an electric mixer fitted with the paddle attachment, cream the cream cheese and butter on low speed until smooth. Stir in the maple flavoring and vanilla extract. With the mixer still on low, slowly add the confectioners' sugar and mix until smooth.

Then you can decorate with these.  Enjoy!

0
comments

November 1, 2010

Coconut Cupcakes with Cream Cheese Frosting

We celebrated a very dear friend's 40th birthday this past weekend.  We hosted a quaint and intimate dinner at our home.  My sister-in-law, Jane (her pseudonym), cooked up an amazing Korean beef and potato dish.  Everyone inhaled it.  We had other traditional Korean fare, as well, which was ordered from a caterer.

Instead of buying a cake, I decided to make coconut cupcakes.  Another friend of ours made these for CJ's 2nd birthday party, and they were amazing! 

Coconut Cupcakes with Cream Cheese Frosting
(Recipe from Ina Garten)

INGREDIENTS:
  • 3/4 pound (3 sticks) unsalted butter, room temperature
  • 2 cups sugar
  • 5 extra-large eggs at room temperature
  • 1 1/2 teaspoons pure vanilla extract
  • 1 1/2 teaspoons pure almond extract
  • 3 cups flour
  • 1 teaspoon baking powder
  • 1/2 teaspoon baking soda
  • 1/2 teaspoon kosher salt
  • 1 cup buttermilk (don't make the mistake I have and get low-fat; it'll change the texture of the cupcake)
  • 14 ounces sweetened, shredded coconut
For the frosting:
(I used a different recipe to get a thicker frosting which is better for decorating)
  • 2 (8 ounce) packages cream cheese, softened
  • 1/2 cup butter (1 stick), softened
  • 2 cups sifted confectioners' sugar (I always cut the sugar in half, so I only used 1 cup)
  • 1 teaspoon vanilla extract
  • 1 teaspoon almond extract

DIRECTIONS:

Preheat the oven to 325 degrees F.

In the bowl of an electric mixer fitted with the paddle attachment, cream the butter and sugar on high speed until light and fluffy, about 5 minutes. With the mixer on low speed, add the eggs, 1 at a time, scraping down the bowl after each addition. Add the vanilla and almond extracts and mix well.

In a separate bowl, sift together the flour, baking powder, baking soda, and salt. In 3 parts, alternately add the dry ingredients and the buttermilk to the batter, beginning and ending with the dry. Mix until just combined. Fold in 7 ounces of coconut.

Line a muffin pan with paper liners. Fill each liner to the top with batter. Bake for 25 to 35 minutes, until the tops are brown and a toothpick comes out clean. Allow to cool in the pan for 15 minutes. Remove to a baking rack and cool completely.

Meanwhile, make the frosting. In the bowl of an electric mixer fitted with the paddle attachment, on low speed, cream together the cream cheese, butter, and vanilla and almond extracts. Add the confectioners' sugar and mix until smooth.

Frost the cupcakes and sprinkle with the remaining coconut.


I decided to add the pink flowers to add a decorative touch and make the cupcakes prettier!  They're easy to make with a Wilton Large Star Decorating Tip 1-M.  I'm hoping to post up a step-by-step how-to in the coming weeks.  But this week will be devoted to another big project I'm working on (stay tuned for that).
 

And what's a party without some good wine?  As a complement to the cupcakes, I purchased what else, but Cupcake wines.  These are a recent new fave (and they're only $8.99/bottle).  I particularly enjoy the Cabernet Sauvignon.

We had such a fabulous time!  And we loved celebrating the life of a sister and friend we dearly treasure! S, you are an amazing blessing to us all!
 

Copyright © 2012 Mother's Mementos | Blogger Templates by Splashy Templates | Free PSD Design by Amuki